
Fisher Pose Ultimate: Hands-On With the Qwen2.1 Pose & Camera Editor on 8GB VRAM
Qwen Image 2.1 — Alibaba Tongyi’s open-source image generation model — has matured into one of the most reliable backbones for character-consistent storytelling, storyboarding, and AI manhua inside ComfyUI. The moment “multi-camera work” or “fine-grained pose control” enters the picture, though, most existing workflows fall back to two engineering tactics: either stack ControlNet + OpenPose nodes, or bolt on a handful of pose LoRAs. Both routes blow up the node count, weaken pose determinism, and push VRAM requirements uncomfortably high. Work-Fisher’s Fisher Pose Ultimate takes a fundamentally different approach: drag a 3D mannequin directly to set a pose, or drop in any reference image to auto-extract OpenPose, and let the underlying model render off that skeleton. It runs on 8GB VRAM, supports both single- and dual-character editing, and is, today, one of the most usable pose-and-camera editors for Qwen Image 2.1.
Below is a nine-section breakdown — from architecture to production deployment — that should give anyone enough context to get useful output on day one.
I. What Fisher Pose Actually Is
Fisher Pose (repo: ComfyUI-Fisher-Pose) is a ComfyUI custom node maintained by Work-Fisher, deeply coupled with Qwen Image 2.1. It is not “yet another pose plugin” — it is a pose-and-camera editor designed for Qwen Image 2.1, covering three core moves:
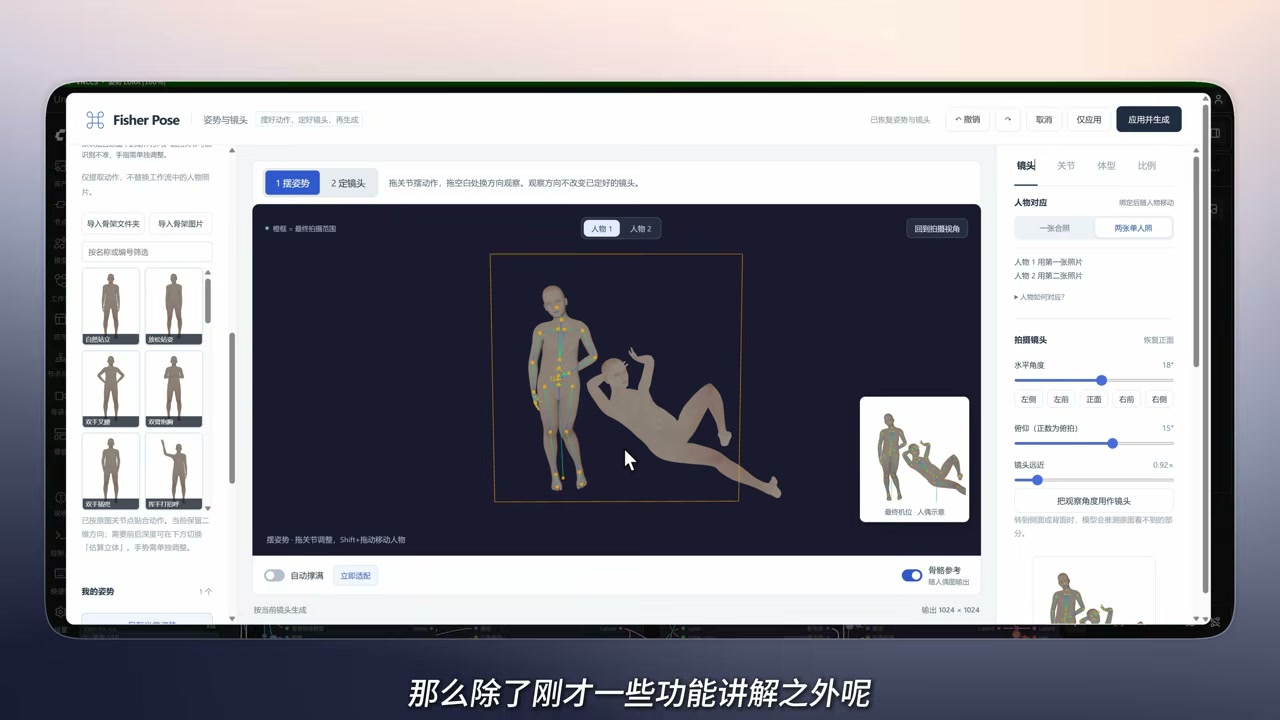
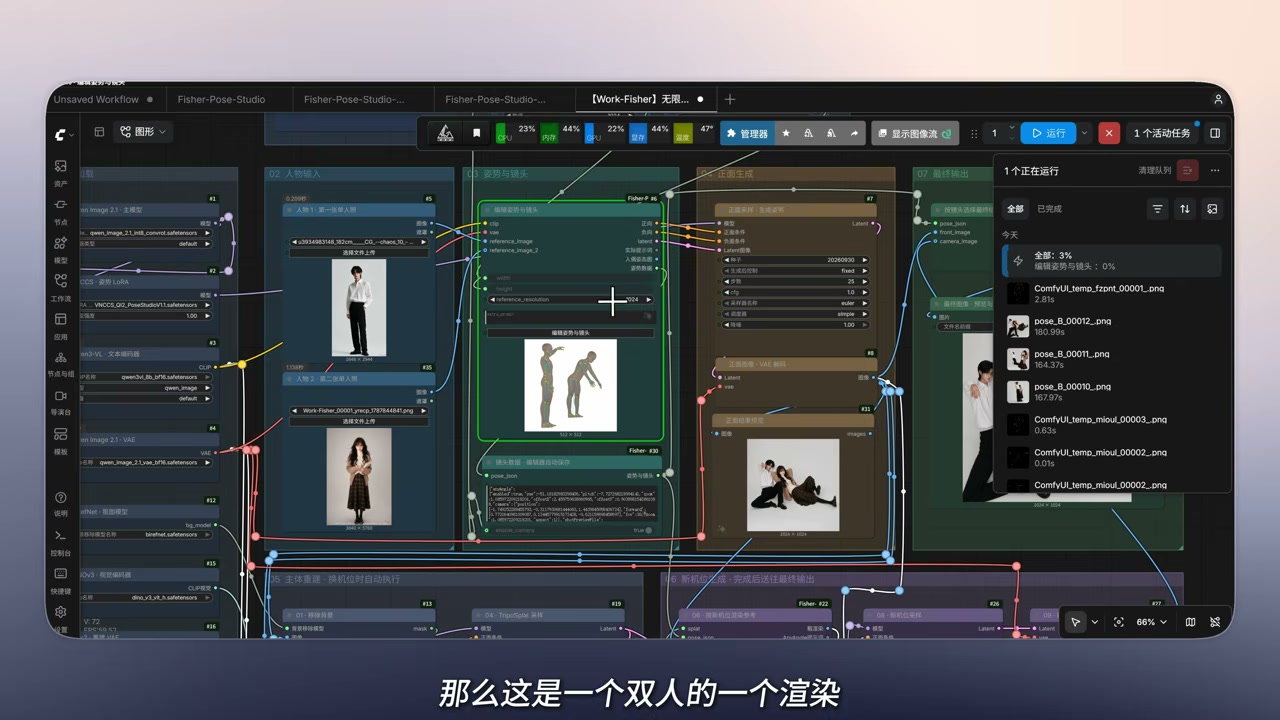
- Pose: drag joints on a 3D live-action mannequin (powered by VNCCS PoseStudio); or click on an OpenPose skeleton image to instantly adopt that pose.
- Camera: orbit the camera around the character for any angle — front, side, top-down, low-angle.
- Multi-target: simultaneously edit pose and camera for one or two characters in the same frame.
Unlike ControlNet, which consumes a control image as conditioning, Fisher Pose wraps pose and camera inside the node inputs so the underlying Qwen Image 2.1 model consumes them directly. This drops the entire ControlNet parameter layer, leaving you at a stable 8GB-VRAM floor.
II. What the Ultimate Edition Adds
Compared to the previous release, the Ultimate Edition’s updates cluster into three buckets: capability completion, manipulation polish, and production engineering.
2.1 Dual-character editing
The previous build only posed a single character. The Ultimate release adds full dual-character editing:
- Both characters can have independent poses, cameras, and body-shape settings.
- Complex actions (one throwing a punch while the other blocks) can be edited simultaneously.
- The underlying LoRA is still primarily trained on single-character data, so single-character output is meaningfully more stable than dual-character — this is a training-distribution limit, not a bug.
2.2 Multi-angle editing — and the bird’s-eye caveat
Multi-camera / multi-angle editing is now fully supported. From the 3D mannequin you can orbit the character a full 360° and generate frames from any of those angles.
There is one boundary to be aware of: side-on or modest angle changes are fine, but extreme bird’s-eye views (top-down) or fisheye-level rotations introduce a small amount of geometric distortion in the character (head-to-body ratio shift, joint warping). This is a side effect of the model’s 3D reconstruction logic, not anything parameter-tunable. Treat bird’s-eye shots as an “occasional creative angle”, not a daily driver — keep your main pipeline on standard front / side / three-quarter views.
2.3 Skeleton export + pose reference image recognition
The skeleton pipeline is now fully end-to-end:
- Skeleton export: export your 3D-mannequin pose as an OpenPose-bearing image, ready to feed into other workflows.
- Reference image → skeleton: drag in any reference image (photo, illustration, whatever), select “Recognize Skeleton”, and the node generates a same-structure OpenPose skeleton — pick one character from it and apply.
- Save current pose: save your current pose as a preset and recall it later. This was a community-driven feature request and made it in.
- Apply + Shift to fine-tune: after importing a reference pose, hold Shift then click a character to nudge its position. (Pitfall: many users asked “why can’t I move the character?” — they were missing the Shift hint.)
- Built-in “normal” preset pose library: the previous build’s “weird” defaults have been replaced with a more conservative set of standard poses.
III. The Five-Step Usage Flow
Here’s the canonical Fisher Pose Ultimate flow. In ComfyUI, generating one pose-and-camera image boils down to five steps:
- Click character, select pose: click the role in the canvas and load a “normal” preset pose.
- Drag joints to refine: adjust joints and body shape; what you see is what you get.
- Lock camera: click the “Lock Camera” button. The camera parameters in the bottom-right of the canvas update as you manipulate. (During pose-setting, the camera does not move; the camera unlocks only after you lock it.)
- Auto-fill: use the “Auto Fill” feature so the rendered frame adapts to the canvas aspect, avoiding character cropping.
- Apply and generate: rendering starts; the single/dual-character image feeds into the downstream Qwen nodes.
Single vs dual: unless you specifically need both characters in one frame, prefer the single-character path — it is meaningfully more stable. Reserve dual for couples, two-person combat, and tight dual-character scenes only.
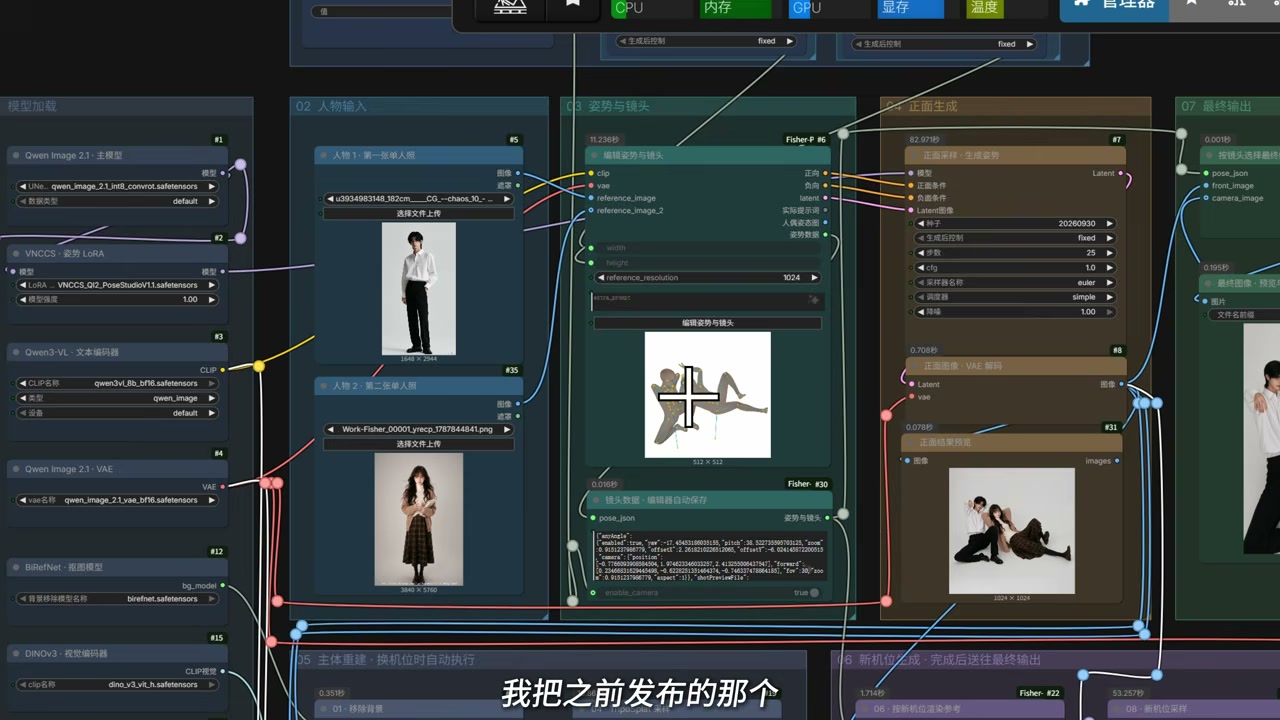
IV. Key Switches and Parameters in the Workflow
Once you drop Fisher Pose nodes into a ComfyUI workflow, there are a few switches and parameters you almost always need to understand.
4.1 The “multi-angle generation” switch
The workflow exposes one master switch:
- Off: only single-angle pose generation — one camera, one frame; great for static character turnarounds or rough storyboard sketches.
- On: simultaneously enables “multi-angle + pose” — same character, same pose, but generates multiple camera angles. Useful for multi-camera storyboards and manhua transitions.
If you only need one pose and don’t want multiple cameras, keep it off — it saves time and compute.
4.2 Output aspect ratio
Default is 1:1. The plugin also supports 16:9, 9:16, 4:3, 3:4, and other common ratios.
Rule of thumb: prefer the “wider” aspect ratios (1:1, 16:9, 4:3) — pose editing often involves large body extensions (fighting, arm-out stances, horizontal swings), and overly narrow frames clip limbs. Reserve 9:16 for half-body turnarounds and character signature cards; it does not work as pose-reference or motion storyboards.
4.3 Joints / Body shape / Save pose
These are optional knobs, not strictly required:
- Joint editing exposes 209 advanced skeleton points (per the repo description); the average user just uses presets.
- Body shape lets you adjust body proportions (head-to-body ratio, height, build) — convenient for chibi ↔ realistic flips.
- Save current pose: store your tuned pose as a preset for reuse — useful for repeated scenes (same character, multiple poses / cameras).
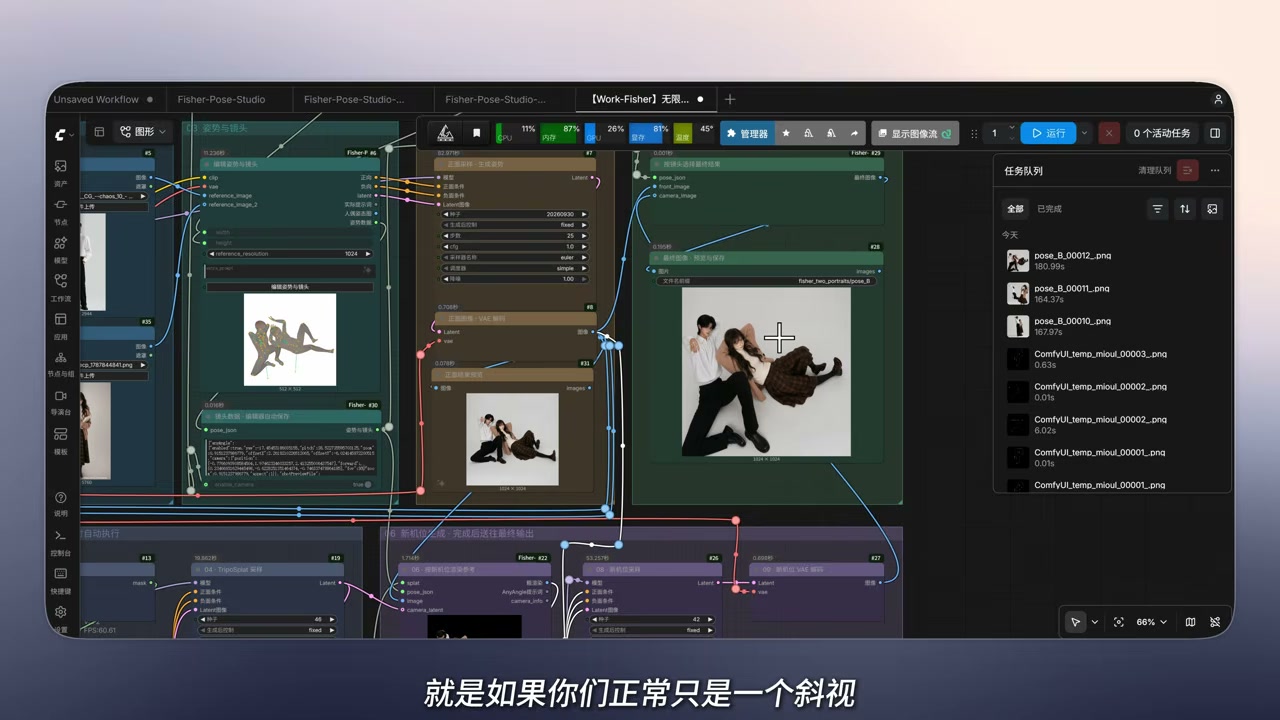
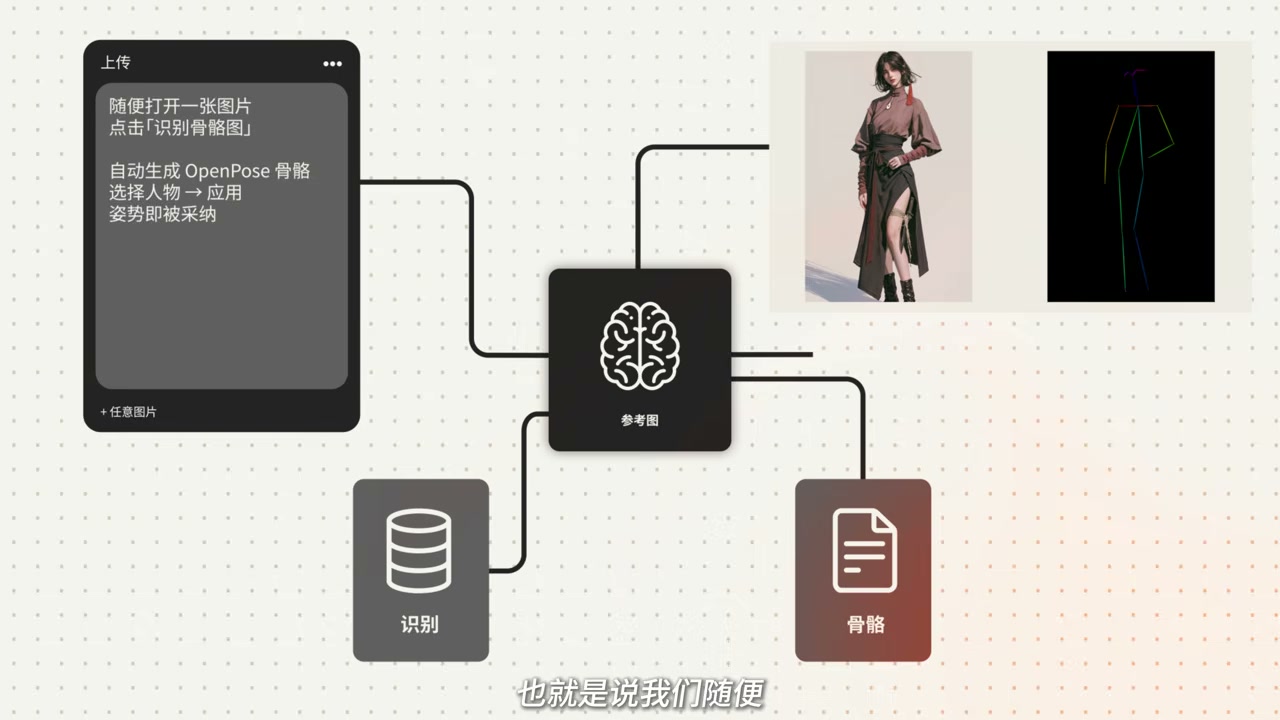
V. Loading Models — The Most Common Pitfall
“Why doesn’t my downloaded workflow just work?” — 90% of the time it is because the models were not manually loaded.
When you first open the Fisher Pose workflow, its nodes reference a number of model paths (Clip, Qwen big-model, VAE, vision model, LoRAs, etc.). On first load, these fields are empty and you must click each model node and pick the matching .safetensors file before ComfyUI wires everything up. The Quark cloud drive already contains every model, and Work-Fisher explicitly says: “you don’t need to worry, all models are in there.”
Default debugging order for “error / black image”:
- Are the model paths correct? Most install errors are directory-path mistakes.
- Did you load the models manually? Empty default fields do not auto-fill.
- Are all plugins installed? See next section — Fisher Pose needs two plugins cooperating.
- Is VRAM sufficient? If OOM, kill multi-angle, drop to 1:1, disable dual-character.
VI. Plugin Installation — Two Are Enough
Fisher Pose Ultimate Edition needs just two plugins:
| Plugin | Author | Install |
|---|---|---|
| Fisher Pose | Work-Fisher | ComfyUI Manager → GitHub URL install |
| Companion plugin | Country Night (in the credits) | Same as above |
The Quark cloud drive packages these as .plugin files ready to drop into ComfyUI’s custom_nodes/ and restart. If a manual install fails, fall back to ComfyUI Manager with the GitHub repo URL — almost always installs on the first try.
If even that doesn’t work, double-check your ComfyUI version itself — many “plugin won’t install” complaints are really complaints about an outdated ComfyUI core. Recent versions of the 0.40 branch have had compatibility issues with third-party plugins; if a plugin won’t install, try downgrading ComfyUI to 0.39.x first — that usually sidesteps the conflict.
VII. Deployment — Local + Cloud
7.1 Local: 8GB VRAM minimum
The 8GB-VRAM entry-level claim is this workflow’s biggest single selling point. Practical hardware requirements:
- VRAM: 8GB minimum (an RTX 3060 / 4060-class card)
- RAM: 16GB minimum; 32GB gives dual-character more headroom
- Disk: Qwen Image 2.1 model itself is ~20GB+, plus LoRA / VAE / Clip / vision model. Reserve at least 60GB for the working directory.
- Recommended OS: Qiuye’s ComfyUI integration package or an official ComfyUI release.
7.2 Cloud: RunningHub is on it
The workflow is on its way to RunningHub (RQ) — front-end-heavy, parameter-rich workflows are slow to cloudify, and it’s still being tuned. Once deployable, the workflow link will land in the source video’s description.
Why cloud matters:
- No hardware gate — a 4090 / H100 run is roughly 8 ~ 15× faster than a local 3060.
- No Python / dependency-conflict debugging.
- Shareable — drop the workflow into a teammate’s hands and they can use it as-is.
VIII. Stability — A Few Practical Notes From Experience
8.1 The “pose misdetected” fallback
Plenty of users report “occasional pose misdetection / pose drift in output”. Work-Fisher gave two workarounds:
- Lock the control seed + randomize: change ControlNet-style strength controls to a random seed and roll the dice; occasionally gets a hit, but isn’t a stable engineering answer.
- Swap LoRAs: the plugin pairs with a VNCCS PoseStudio LoRA. Swapping that LoRA or shifting its weight (between 0.6 and 1.0) measurably changes recognition success rate.
8.2 Dual is naturally less stable than single (one more time)
Worth saying once more: the LoRA is single-character-dominant in training, so dual-character output being a notch less stable than single-character is expected behavior, not a bug. For manhua double-checks / fighting duos / tight dual-character scenes:
- Render single-character images separately, then composite in ComfyUI with layer nodes.
- Use a “reference-image-to-video” workflow (see MiniMax H3 Martial-Arts Video Generation Workflow: An Engineering Breakdown on 12GB VRAM) — feed Qwen the storyboard, then let a video model handle motion continuity.
IX. Plugging Fisher Pose Into an Existing Pipeline
Fisher Pose is only a “pose + camera” intermediate. The actual output node is still Qwen Image 2.1 (or a paired base model such as Flux or SD). A typical production pipeline looks like:
1 | Script / storyboard |
If you’re already producing AI manhua, this slot directly into your existing “script → storyboard → image” pipeline:
- Storyboard stage: pose image generated via Qwen Image 2.1 (driven by Fisher Pose).
- Key frame / character card stage: single 1:1 turnaround (Fisher Pose + face-fix post).
- Multi-camera / action continuity: generate multiple angles simultaneously, pick the one closest to your storyboard intent.
Fisher Pose solves the precision problem in the “pose control” stage of the pipeline — it does not replace a full text-to-image / video workflow. Drop Fisher Pose into your existing workflow as a “pose source” layer; don’t tear down the whole pipeline.
X. Wrap-up + Onboarding Checklist
If you’ve spent any time in ComfyUI, you’ve probably already noticed Fisher Pose Ultimate’s positioning: a pose-and-camera editor tailor-made for Qwen Image 2.1, replacing the ControlNet+OpenPose path with a directly drag-able interactive node — and bringing the VRAM floor down to 8GB. Once RunningHub finishes deployment, the cloud path will also be viable, effectively lowering the engineering bar for pose and camera control on Qwen Image 2.1 by a whole step.
Onboarding checklist:
- Hardware: 8GB VRAM + 16GB RAM minimum; RTX 3060 / 4060 class is fine.
- Environment: Qiuye’s ComfyUI integration pack or the latest official ComfyUI release; if you hit plugin compatibility issues, temporarily roll back to 0.39.x.
- Plugins: Fisher Pose + Country Night’s plugin — that’s it; install via ComfyUI Manager.
- Models: Clip / Qwen big-model / VAE / LoRA / vision model — load them manually; everything is in the cloud drive.
- Flow: click character → pose → lock camera → auto-fill → apply and generate.
- Aspect: prefer the “wider” options (1:1 / 16:9 / 4:3); reserve 9:16 for half-body turnaround only.
- Stability: single > dual; bird’s-eye distortion is a model limitation, not your fault.
- Beyond: RunningHub cloud workflow (check back if it isn’t live yet).
For more engineering detail on Qwen Image 2.1 and AI video generation pipelines, you might also want:
- MiniMax H3 Ultimate Workflow: DMAD-Accelerated LoRA + Single-Node Two-Pass Sampling — 12 Steps for Both Dialogue and Action Scenes — another author (YZ_Jinyu) in the same open-source ecosystem with a video-workflow angle.
- MiniMax H3 Martial-Arts Video Generation Workflow: An Engineering Breakdown on 12GB VRAM — a holistic engineering view that ties image / video / pose together.
If you find new workflows or new models that should show up in the next round-up, drop them in the comments — let’s push ComfyUI’s pose control one step closer to actually-3D together.
Useful resources
- Work-Fisher/ComfyUI-Fisher-Pose (GitHub) — the plugin repo, with 209 built-in skeleton points + VNCCS PoseStudio LoRA.
- ComfyUI-Fisher-Pose-i18n (GitHub) — multilingual fork with English / Japanese / Chinese UI.
- Qwen Image 2.1 (Tongyi Lab) — the underlying image generation model.
- RunningHub (RQ) — cloud runtime for Fisher Pose (deployment is still in progress; once live, the link lands in the source video’s description).
- ComfyUI (official) — the node host; prefer stable releases over nightly.
The real point of this workflow is “fold pose and camera control into a single interactive node” — not piling up parameters. Spend your energy on character consistency and storyboard design; that pays back more than re-engineering the same graph three times.